The Fraunhofer Development Center for X-ray Technology EZRT, a division of Fraunhofer IIS, is working on the research area of non-destructive testing in close cooperation with Fraunhofer IZFP.
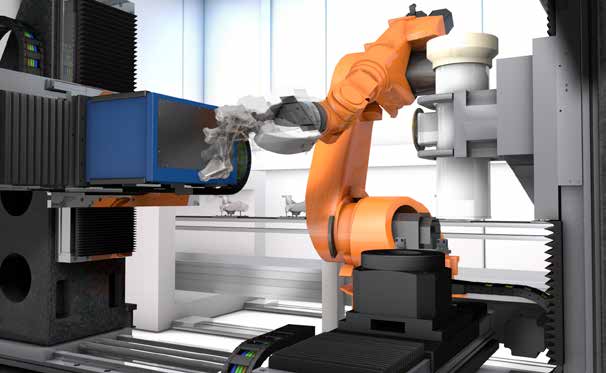
Price pressure in the automobile industry is just as high as the quality standards. The suppliers of components like light alloy cast wheels, chassis components, cylinder heads or crankcases must develop their parts quickly and cost-effectively and, above all, must deliver flawless products. This is where quality control plays a central role. Large quantities must be checked rapidly and reliably to make sure that no embrittlement or fine hairline fractures are present in the components. In the future, the results of the inline monitoring of production processes and product quality will also be applied for production and parameter optimization by means of intelligent feedback loops. The problem with current procedures is that in order to X-ray larger components, they must be moved between the X-ray source and the detector by a robot.
Up to now, the robot has always had to stop its movement in order to make X-rays of the specimen. A new technology development by Fraunhofer EZRT now makes it possible for high-resolution X-rays to be made from different perspectives while the component is moving. This drastically saves time: The exposure time for a picture of one position now only lasts around five milliseconds whereas it took approx. eighty times longer with conventional technology. The name of this method is “Dragonfly” – named after an insect that is fast and agile and that can abruptly change the direction of its movements. A robot turns the part to be inspected into different positions, and X-ray images are taken while it is moving. The exposure time of the applied X-ray source is as short as that of conventional photography. In addition, the XEye-Detector (also a development of Fraunhofer EZRT) is distinguished by a spontaneous and freely adjustable exposure time as well as a long service life. The testing time of a cast component is thus cut by about half, which is a big step in mass production.
Large and thick-walled objects such as automobiles, freight containers and aircraft parts, could only be examined up to now using X-ray computed tomography, after being disassembled into smaller parts. Fraunhofer EZRT has a worldwide unique XXL computed tomography, scanner made for this purpose. Objects up to 4.60 meters high and with a diameter of up to 3.20 meters can be examined with the XXL CT technology. The test facility has an area of 400 square meters and is 16 meters high. Enough space is therefore available for examining large objects. The task here is the non-destructive examination of objects like automobiles, aircraft parts or freight containers including cargo. The facility enables the quality control of objects that, up to now, could only be checked partially or not at all with conventional methods.
Further applications are the analysis of art-historical objects as well as crash analyses and the resulting stiffness optimization of automobile bodies. Energies of a maximum of 9 MeV can be attained, which corresponds to approximately the 20-fold of conventional industrial X-ray systems. This enables the X-ray analysis of 30-cm thick steel objects or a maximum of 60 cm thick aluminum structures. Construction errors, material defects or other areas that are difficult to access from the outside can be precisely detected, characterized and evaluated with this method. With an effective resolution of below 0.4 mm, even the smallest defects can be recognized in large objects.
 Fraunhofer Group for Materials and Components - Materials